Wednesday, October 26, 2016

Breastfeeding Gear – Suck It Up!

Mommylicious

It all starts with the question at your OB/GYN’s – Are you going to breastfeed? As you circle around ‘Yes’, little do you know what a special journey you will embark on with your little one.

Having exclusively breastfed my son for 6 months (and still going strong at 14 months) , all I can say is breastfeeding is the most fulfilling aspect of motherhood. It is hassle-free, easy and economic. But if you are a first-time mom, you need to gear up for it.


Must-Have Breastfeeding Gear:

A few things to invest in to make breastfeeding more enjoyable:

·        Breastfeeding Attire:

If there is one thing that will make nursing easy, it is your clothes. The pre-pregnancy bras will not fit anymore. So quit purchasing all those Victoria Secret bras when you get pregnant. A regular bra will only cause more pain to your engorged breasts. Having nursing bras, nursing tanks and a few button-down shirts will give you one less thing to stress about while tending to a hungry baby. I lived in nursing tanks for the first one year after my son was born. It is comfortable, easy to unclasp and all tired nipples need. 


QT Intimates Lace Underwire Nursing Bra Image result for nursing tanksImage result for nursing tops button down


·        Nursing Pillow:

Breastfeeding can be back-breaking too (as if pregnancy was not enough!). Getting a nursing pillow will ensure you do not strain your back while breastfeeding every few hours. Not only will you be comfortable, but so will your baby. With a nursing pillow, it is just so much easier to give support to your arms and the baby. I loved the Boppy Pillow as it can be used for propping up the baby by the second month and helping the baby sit later on. 


Image result for boppy nursing pillow


·        Nursing Pads:

Truth be told, breastmilk will leak and stain your clothes. When my baby would feed on one side, my other side would leak all the time. For 11 months, I could not stay a day without nursing pads. I had extras stuffed into the diaper bag and my purse just so I am not caught with milk stained clothes. Nursing pads will keep you dry and save your pretty dress. They come in a few varieties but my nursing pad of choice is the disposable one with adhesives. 
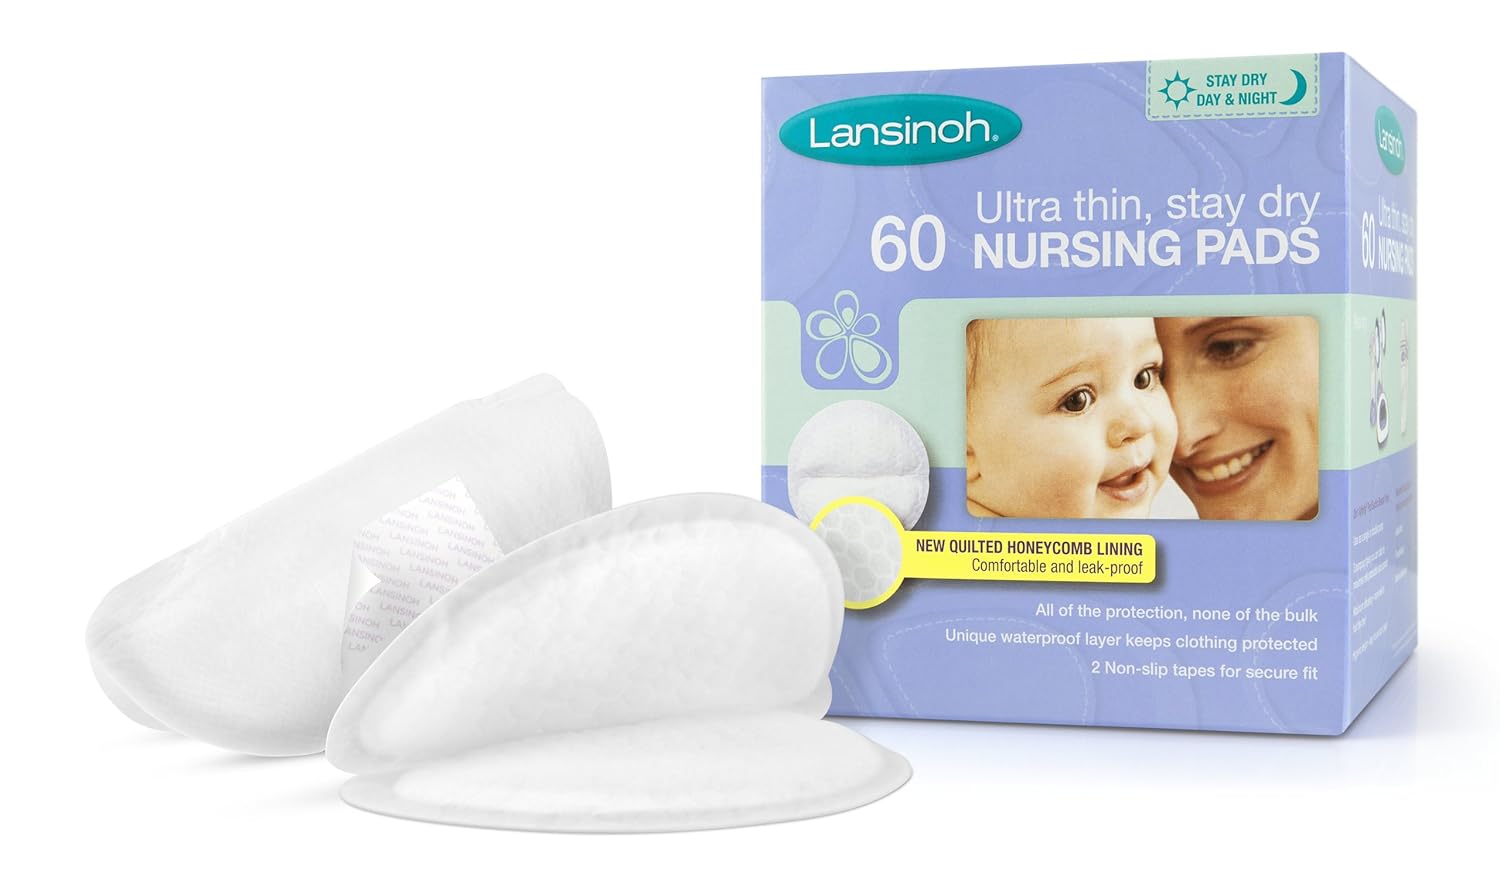

Image result for nursing pads


·        Nursing Cover:

When your newborn needs to be fed, it needs to be fed. If you are anything like me and are not comfortable with breastfeeding in public, a nursing cover is the answer. Nursing covers come in a wide array of colors and patterns, and they are breathable. The one I used by Boppy had a way of marking the side I fed my baby. It also prevents the baby from getting distracted when you are trying to feed him in a mall (or aquarium, like me). This one by Boppy folds into a little pouch and is so easy to carry around. 


Image result for nursing cover by boppy

  
·        Nipple Cream:

It is the only solution to cracked and sore nipples. As harsh as it sounds, as a new mom you will experience sore nipples (and maybe cracked too, in some cases); what with feeding the baby every 3 hours for months. Nipple creams will soothe and heal sore nipples. Some nipple creams are harmless if consumed by the baby at the time of breastfeeding. So, lap it up. I loved Lansinoh as it does not have scent or color and is completely safe for the baby. 


While most people will say how breastfeeding saves you a ton of money, it needs some investment. Breastfeeding is good not just for the baby but also for the mom. If you can breastfeed and get the chance to do it, embrace it. It is a blessing. 


This is not a sponsored post. 


Monday, October 17, 2016

5 reasons to attend MommyCon

Mommylicious

MommyCon

MommyCon is coming to San Jose on October 29th, 2016. Here are 5 reasons why you should be there.


1. Connect with the other Moms

MommyCon is that one place where all moms gather. Apart from all the friends you have made at the park and your local Mommy and Me Meetups, this is the chance to make new mom friends in your city. MommyCon encourages moms to exchange contact information so that they can meet time and again. It is a great chance to bond with other moms who have a similar journey in the parenting world and bask in the joy of motherhood. Who knows, you might end up meeting your new bestie here (and maybe, your little one too)? 

 2. Experience all things Baby

MommyCon is an event where you will spend almost 8 hours (or more) being surrounded by all things baby. If you are expecting, you will get hands-on (literally) experience of all the stuff you need for your baby. You can try stuff on and test them before purchasing them like baby carriers, car seats, breast pumps, teething jewelry etc. These are premium brands that you will not find at the regular baby stores. If you are a mom already, be ready to enter mommy paradise. You will get a great chance to shop around for your little one. 

3. Shop till you drop

Are you one of those moms who loves shopping for their babies? I sure do. There are over 50 vendors who will have their products on display. Most of the brands are eco-friendly and want to make moms and their babies feel special. You are sure to stumble upon brands that adhere to your style of parenting. Some of the brands are pretty exclusive to MommyCon and can be hard to come by at the regular supermarkets. So, don't miss this chance.

4. Make it a fun family outing

It is a convention for moms and moms-to-be. But dads are welcome too. You can get your family along (kids below 12 go free) and have a fun-filled day. There is something for everybody. There are workshops and seminars on car-seat safety, cloth diapering, breastfeeding, childbirth, baby wearing, sleep consultation etc. Your little ones can get busy at the Crafts and Coloring Corner. You can head to the Baby Food Court when you need to feed your baby or toddler. Come together as a family and frolic.  

5.Giveaways and Freebies galore

Do you like free stuff? Who doesn't? If you are like me, you know the value of freebies. You will actually get to sample these amazing products for free before you actually decide to invest in them. It is the best way to try out new products while not spending your hard earned money on it. Anyone attending MommyCon goes home with a Swag bag packed with goodies from sponsors. You also get to participate in all the giveaways throughout the event and win awesome prizes.


Event Details: Mommy Con San Jose
At the San Jose Convention Center
On October 29th, 2016, Saturday
Tickets- $45 - $100


This post is not sponsored. 


Thursday, October 6, 2016

Mommy Lifesaver - Quick Tuscani Chicken Alfredo Pasta


Mommylicious


Italian is my favorite cuisine. I love my pizzas and pastas. Every now and then during my trips to Target, I stop by at the Pizza Hut in it to grab a quick bite. More often than not, that happens to be the Tuscani Chicken Alfredo Pasta. As much as I love having this pasta, I hate how little I get for the money. So I decided to recreate this pasta dish at home.


As with everything else, I did my research and came up with at quick and easy mommy version of the Tuscani Chicken Alfredo Pasta. Most of the cooking happens in the oven so mommies can give all the attention to your little ones. 

Ingredients:

Pasta (any kind)
Alfredo Pasta Sauce (store-bought or homemade)
Chicken Breasts
Cheese (Mozzarella and Parmesan)
Olive Oil
Crushed Red Pepper (optional)

Method:

1. Boil the pasta according to the package instructions. You can use any kind of pasta you have on hand. I used spaghetti on this particular day. Drain the pasta and keep aside. 

2. Pre-heat the oven to 375 degrees. 

3. Heat up some olive oil and grill the chicken breast. Season the chicken with some salt, pepper and crushed red peppers for some heat. Once cooked on both sides, let it cool and slice the chicken up. 

4. In a baking dish, pour the pasta. Generously pour the Alfredo sauce on the pasta. Sprinkle the sliced grilled chicken. Top it with lots of Mozzarella and Parmesan cheese. 

4. Bake it at 375 degrees for 15 to 20 minutes.


Before getting into the oven.

After it comes out of the oven.
This Tuscani Chicken Alfredo pasta is a dish you can play around with depending on the time you have on hand. You can use different types of pasta each time you make it. You can add minced garlic to the chicken or in the Alfredo sauce, if you are a garlic-fanatic like me. And if you have time or are in the mood, make your own Alfredo sauce. I resort to store bought pasta sauce since becoming a mom. 

This Tuscani Chicken Alfredo Pasta will be ready in no time. All the ingredients are sitting in the pantry or refrigerator all the time. It is perfect for days when you are in a rush to get done with dinner, or want to have something delicious without having to go to a restaurant; or if you are just feeling lazy but don't want your family dinner to reflect that. Your family will love this pasta dish and you will be flooded with requests to make it again. 

It is a go-to pasta dinner in my house. I prefer having my go-to recipes rather than having to-go from a restaurant. 


This is not a sponsored post. I love Pizza Hut and let me just say that imitation is the best form of flattery. 


Friday, September 23, 2016

Mommy Lifesaver - Healthy First Birthday Smash Cake

Mommylicious


First birthdays can be really daunting to plan (at least for first-time moms). Not to mention how challenging it is to come up with the perfect smash cake for the little one. Challenging, I say, because not only will your baby smash it and play with it, but he might also taste it or eat a big chunk of the cake. I wanted my son to have fun with the smash cake but I did not want him to have all the sugar. 

Since the introduction of solid foods, I was so careful not to add salt and sugar to the baby-food. Some babies do not have egg whites up until their birthday cake. And then cow's milk is off the list too. But just as your little munchkin turns one, he is suddenly allowed everything. But we, of course, do not want to introduce them to excessive amounts of sugar, egg whites, (cow's milk) butter and cream together on his first birthday. You would not want to live the whole day in fear of some unknown allergies spoiling your baby's birthday. 


I love the tradition of smash cakes and I feel the birthday cake is a significant part of any birthday party. 

As an advocate of all things healthy, I did not want my son to pounce on a big store-bought sugar-y cake. I wanted to know the ingredients list and have some control over it. So, I did my research and came up with a healthy smash cake idea. It is a delicious 2-tiered cake with simple ingredients. It has very little sugar as it derives its sweetness mostly from fruits like bananas and applesauce. 


Ingredients:

Cake-

1 cup flour (can use wheat flour instead)
1/2 teaspoon baking soda
1/2 teaspoon baking powder
1/8 teaspoon salt
1/4 cup confectioner's sugar
1 ripe banana
1 apple made into unsweetened applesauce
1/4 cup milk (prefreabbly whole)
1 egg yolk
1 teaspoon vanilla extract (alcohol-free)

Frosting-
4 oz cream cheese
1/8 cup confectioner's sugar

Directions:

Cake-


  • Preheat your oven to 350 degrees.
  • You can use 2 small 4 1/2 inch spring form pans or 1 large 9 inch spring form pan. Grease the cake pans with butter and dust flour on them.  
  • Mix all the dry ingredients like flour, sugar, baking soda, baking powder and salt together in a bowl.
  • In a blender, blend the banana, applesauce, egg yolk, vanilla extract and milk. 
  • Mix the wet and dry ingredients in a bowl using a hand whisk. Do not over-mix. Make sure the batter is free of lumps.
  • Empty the cake mix into the pans.
  • Bake at 350 degrees for 20 to 25 minutes or until a toothpick comes out clean when poked into the center of the cake. 
  • Place the cakes on a cooling rack while you prepare the frosting.


Frosting-


  • Use an electric hand mixture to whisk the cream cheese (room temperature) till it is light and fluffy. You can totally use whipped cream instead. Or add a little whipped cream to the cream cheese. It will all be yummy. 
  • Add the sugar and whisk some more. You can skip the sugar altogether if you want it to be healthier.
  • For fun colors, you can add any berry puree to the frosting like blueberry or strawberry or raspberry. Match it to your party theme. 


Assembly- 

If you have 2 small cakes you can place one top of the other and place frosting in the middle. If you have one large cake, cut out 2 smaller cakes from it using a glass or bowl. You can even have 2 different sized cakes and make an interesting 2 tier cake.

Put the frosting on all sides and give it the look you desire. Make it as colorful as you want. You can decorate the cake with anything, from sprinkles to fruits to cheerios. Match it up to the theme of the party. Your munchkin will love it anyway. I left my frosting white and added some cheerios and sprinkles. Just make sure you do not add anything that can be a chocking hazard for the baby.   


The ripe banana and the applesauce will make the cake moist, so you will not need to add butter. This healthy smash cake is going be a little dense, not quite like the fluffy store bought cakes. But this smash cake is healthy and yummy. 


We celebrated my son's first birthday last weekend and he just loved this cake so much. He played around with the frosting, munched on the cheerios, and ended up eating the cake like a pro. I guess he gets his sweet-tooth from his mommy!

The preparation time was about 1 hour. Seeing my son's face light up while eating the cake just made me happy beyond words. The experience was so fulfilling and all you want to do for your child is ensure that he is healthy and happy.  


This recipe is totally mommy and baby approved. You must have guessed by now that I love baking, especially for my family. For more simple recipes you can go here or here. 


Friday, August 26, 2016

Mommy Lifesaver - No-bake Strawberry Cheesecake

Mommylicious


It was my husband's birthday last weekend and (like always) I could not zero in on the kind of cake I wanted to make for him. I always bake him a cake for his birthday, no matter what the situation. Last year, when I was still very pregnant, it was relatively easier for me to get things done. But this year I have an 11 month old, and let me just tell you my hands are full. It is just incredibly hard to get anything done around the house, let alone do something fancy like bake a cake.

So, I had to come up with a quick fix. A no bake cheesecake it is, I thought. After using my son's nap times to research on the kind of cheesecakes, I finally zeroed in on a very simple yet crazy delicious Strawberry Cheesecake 2 days before the birthday. That evening I made a quick trip to the grocery store. 


Let me first tell you how it is a Mommy Lifesaver. Firstly, it requires no baking. Yes, that means no eggs, no flour and no checking in on the oven. All you do is mix everything up and shove it in the refrigerator. Secondly, it takes a few ingredients and very little time (I am talking 30-45 minutes) to get the cheesecake done. I made this cake when son went to bed the night before the birthday. 

To give you some perspective, we just moved into our new house exactly a week back, there is an 11 month old cruising around the house bumping into and banging everything, it is my husband's birthday and I am expecting a few guests. This No Bake Strawberry Cheesecake just made me look in-control and put-together (despite the craziness). It is so delicious that everyone tasting it will only rave about your culinary and mommy skills and how you managed to pull this cake off with a toddler sticking to your legs in the kitchen (true story!).
Now, getting down to the recipe. I found this recipe from the Philadelphia Cream-cheese makers. They literally, saved the day. However, you can use any brand of cream-cheese. This blog post is not sponsored by any brand and I paid for all my ingredients (in case you were wondering).

A little side-note - you would want to make this cake at least 12 hours in advance, as it needs to set in the refrigerator. 


Ingredients (for a 9 inch spring-form pan):

Graham Crackers - 1 pack
Butter - 1/3 cup (melted) and 1/2 cup (room temp.)
Fresh Strawberries - 4 cups
Cream Cheese - 2 8oz packs (room temp.)
Heavy Whipping Cream - 2 cups
Orange Juice - 1/2 cup
Lemon Juice - 1 tbsp
Confectioner's sugar - 2.5 cups
Unflavored Gelatin - 2 envelopes

Method:

Crust - Ground the Graham crackers in a food processor and mix in the melted butter. Line a 9 inch Spring-form pan with parchment/wax paper on the bottom and the sides. Pour in the graham cracker-mix at the bottom and press it hard in place with a flat-bottom cup. 
I recommend using a spring-form pan for cheesecakes, it just makes life easier. 

Keep this in the refrigerator while you prepare the rest of the cake.

Cake- Keeping aside about 6 strawberries for garnish, slice up the remaining strawberries vertically. Use the largest slices to line up the sides of the spring-form pan over the wax paper. Finely chop up the smaller bits of strawberry slices and keep aside. 

Heat up the Gelatin in a small pan over low heat while you mix up the rest of the ingredients. Stir occasionally. 

Use a stand or hand mixer to mix the following - cream cheese (room temp.), 2 cups sugar, 1 cup whipping cream, orange juice, lemon juice, gelatin and chopped strawberries. 

Pour this mixture into the spring-form pan.

You could leave it at this and just garnish with a few fresh strawberries.

Or you could just add a whipped cream frosting, which is incredible easy to make but ridiculously yummy.

Frosting - Use an electric hand mixer to mix 1 cup of whipping cream, 1/2 cup of confectioner's sugar, 1/2 cup room temperature butter (a few drops of vanilla essence - optional). Make sure this is beaten till it is light and fluffy.
A little tip - never microwave the frozen butter, you will never get the right texture for the frosting. Use soft room temperature butter for the perfect fluffy frosting.

Spread this yummy goodness over the cream-cheese mixture on the spring-form pan and garnish with strawberries on top. Decorate the cake with fresh strawberries whichever way you want. 

Keep the cake in the refrigerator overnight or at least 6 to 8 hours before serving. 

Before serving, take off the side of the spring-form pan. Slowly remove the wax paper from the sides and a gorgeous Strawberry Cheesecake will be staring at you, ready to be cut. 


I will confess I tasted the batter while making it (only to check the sugar I promise). So I kind of knew how yummy this No bake Strawberry Cheesecake was getting. 

It completely wow-ed my husband and my guests. They did not mind the huge slices I gave them. This no bake cheesecake is of a supreme kind that you can make on special occasions. It is perfect for birthdays. No one will ever know how pressed you are for time and how easy this is when they have this cheesecake. A must-try this mommy says. 

Are you looking for a healthy smash cake recipe for your baby's first birthday? Find it here.

Find a delicious one pot pasta recipe here, totally mommy-approved.  


Tuesday, June 21, 2016

Mommy Lifesaver - One Pot Pasta

Mommylicious


Mommy Lifesavers is a little series that I am starting to share some of the things that have been a blessing in my life since I have become a mom. The items featured in this series are things I was aware of previously but never really paid much attention to before the birth of my son. But now in this new-mommy phase of my life, these things have saved the day.

The first item in the series is the One Pot Pasta. 

The internet has been brimming with various recipes of One Pot Pasta for a while now. I had no idea why anyone would make something like this when you can have pasta in many other (delicious but elaborate) ways. But when I was hard pressed for time, this is the recipe I resorted to. 

Now the One Pot Pasta can be done in various ways. My go-to One Pot Pasta dish is made up of all things I almost always have on hand. I make it for either lunch or dinner. I make it when there are no leftovers in the refrigerator. I make it when I cannot find the time to go grocery shopping. Most importantly I make the One Pot Pasta when my 9 month old keeps me occupied all day long. 

The One Pot Pasta is the busy/ sleep-deprived/ lazy but smart mom's escape.  

Let's jump right into the pot.

Ingredients:

Pasta (of any kind, whatever you have on hand)
Veggies (as many types as you have sitting in your refrigerator)
Cheese (preferably Mozzarella and Parmesan, but add what you have)
Herbs (choose from Parsley/Oregano, fresh or dried)
Protein (optional, chicken/turkey/sausages/chorizo anything will do)
Salt
Pepper
Crushed red pepper (if you like a little heat)
Olive Oil
Water
Here I have used 1 small onion, half a tomato, 2 jalapenos, garlic and fresh parsley and spaghetti. 


Method:
  • Chop up the veggies and fresh herbs. Mince the garlic.
  • If you want to add any protein, chop and fry that up and keep aside.
  • As the name suggests, just dump all the ingredients in the pot along with the uncooked pasta. 
  • Add salt, pepper, crushed red peppers, and/or dry herbs. 
  • Drizzle some olive oil. 


  • Add about 1.5 cups of water. The pasta will cook in this water. So, use your discretion with the amount of water. 
  • Cover and cook for about 10-15 minutes or till the pasta is al-dente.
  • Stir occasionally to prevent sticking.


  • Sprinkle cheese and stir till the cheese melts into the pasta.


  • Garnish with some fresh herbs.
  • Serve hot.


This is one dish you can really play around with. You can switch up the veggies and the protein to add variety. So, may be you end up making the On Pot Pasta every week, but it is going to be different everytime as the ingredients keep changing. You don't have to play by the rules with this dish. 

The One Pot Pasta is just incredibly delicious and will please everyone in the family, both kids and grown-ups. 

It is super easy and convenient to make the One Pot Pasta. It requires very little time; just the time for chopping up the veggies. But no one will be able to tell from the taste how easy and quick this recipe is. 

My husband keeps requesting for the One Pot Pasta and I keep going back to it because this is yummy and fills the tummy and easy on the mummy! 

Try it, especially if you have a little one who keeps you busy. It is such a lifesaver.   


Wednesday, March 9, 2016

Starting solids (Stage 1 Baby Food)

MOMMYLICIOUS


Nothing excited me quite as much as introducing my son to the magical world of food. May be it is a foodie mom's dream to cook up delicious baby food concoctions. For all those 9 months of pregnancy I got to understand my son's size in terms of fruits and veggies. I could hardly wait to see how my Sweet Pea would react to sweet peas. 

When to start?
Usually babies who are formula-fed start solids by 4 months, while breastfed babies start by 6 months. Since I was exvlusively bresatfeeding I decided to introduce him to the world of solid foods at 6 months. I was in no hurry to wean him to solids because he is going to have food in this form for the rest of his life. And honsetly, breastfeeding has been the easiest way to feed; no bottles, no warming up, no cleaning and washing or sterilizing. I did not want those golden days to be over. My son was very content with nursing and I got my pediatrician's nod, so I waited till his 6th month birthday to give him the first taste of food. 

Home-made baby food
I decided to go through the traditional way of purees, gradually moving into more complex textures and flavor combinations. I am not a fan of jarred baby foods. The idea of feeding my son an apple that may be a year old and sitting in a jar for months, does not appeal to me. I know the jarred baby food is convinient and hassle-free but I am ready to go that extra mile to ensure that my baby is eating healthy. It is more like I want to be in control of what my baby is eating. In making my own baby food at home I am aware of all the ingredients in it and know that the food has not been processed in a way that compromises its nutritional value. 

Purchasing Fresh Produce
I have been buying only organic produce for my son's food as I do not want to expose him to all the pesticides and chemicals so early on in life. Regular produce works well too, but I just feel better about organic food for my baby. Some hard-shelled vegetables do not allow the pesticides to penetrate, making them safe anyway. Buying organic produce is a personal choice, really. 

Baby food-maker
I have been using the Baby Bullet for making all the baby food at home. You do not necessarily need to invest in a special baby food maker; any blender will do the job just fine. But I decided to go for a separate baby food maker simply because of the size. My regular blender requires me to make large quantities and the Baby Bullet was just convinient portion-size wise. Once I started making baby food at home, I realized how easy it all is. If you can sqeeze out an hour from your busy mommy-schedule, you can end up making a month's supple of baby food. Personally, making my son's food myself gives me a different high. Experimenting with the taste and texture of the food is just too exciting.  

Saving a pretty penny
It is actually cheaper even if you are buying organic fruits and veggies and making baby food at home than buying jarred baby food. Each baby food jar costs about a dollar to a dollar and half. Each jar provides for about two meals. And the cost just keeps adding up. On the other hand, an organic apple which might be some 60 cents can make baby food for a week. Since babies eat such tiny portions, about 2 oz per meal, a single fruit or vegetable can go a long way. You can do the math youself. 

Stage 1 foods:
The recommended Stage 1 vegetables are green peas, green beans, carrot, sweet potato, winter squash, zucchini. Stage 1 fruits are avocado, banana, apple, peach, nectarines, pears, apricots, plums, prunes, mango. Stage 1 cereals are rice, oatmeal and barley.

I was suggested by my pediatrician to start with single grain fortified cereals, then vegetables and finally fruits. Among the veggies and fruits, I was told to give the greens before the oranges/yellows (because the greens are not as sweet or as tasty). Consequently, I started giving my son Rice Cereals mixed in breastmilk. He loves it, probably because of the familiar taste of breastmilk. Although avocado is a fruit, I decided to give it to my son as his first food. Avocados are considered a superfood as they are high in unsaturated fats (the good fats), protein, folate, fibre and lots of other nutrients. Avocados also have a creamy texture making it a perfect first food. 

Making purees
Except banana and avocado, all the stage 1 fruits and veggies can be boiled or steamed before making purees. I prefer steaming because it retains the maximum nutrients in the food. With veggies like sweet potatoes, you can roast them in the oven before making purees.
If you want to break it down, it boild down to the follwing simple steps:
Wash the vegetables throughly.
Peel them, if need be.
Chop them into small cubes.
Bring water to a boil in a pot and steam the veggies in a steamer basket.
Blend the veggies in the blender using water/breastmilk to the desired consistency.
Divide the food into little storage containers for the refrigerator.
The rest of the food can be frozen into cubes in ice trays in the freezer.  

Storing baby food
Freshly made purees are good in the refrigerator for upto 3 days and in the freezer for upto 30 days. If you follow the 4 day rule, where you introduce a new food every 4 days to check for any allergies or reactions, you can keep food for the next 3 days in the refrigerator and the rest in ice trays in the freezer. The day before serving you can bring the frozen food cube to the refrigerator to thaw. 


P.S. - It is best to consult your pediatrician before introducing any food to your baby, as every baby and his needs are different.

Let me know if you want me to review the Baby Bullet. Leave a comment below if you want to know about the feeding essentials for a baby. 
Also, lets get chatty about the foods your baby loves and hates, their first reactions or any memorable feeding anecdote. 


If you are interested in Baby Food Haul, check this out.